Sunday, 29 December 2013

Executing / Running a script on a web page


Firstly install a user script manager like Greasemonkey in a web browser e.g. Firefox


Then install a script from a preferred source like userscripts.org


This will then add the necessary actions to the relevant web page


notice the "import into MB" button that was added via the user script.


These type of scripts can be great for scraping or collecting info from web based applications without the need to re-type everything.

Install SVN on QNAP NAS

Installing SVN on QNAP

ssh into the QNAP NAS with the admin account.


on the QNAP then install SVN via ipkg

ipkg update
ipkg install svn

To determine the hard drive / volume you want to save the repository on:

df

will show something like:

/share/HDA_DATA

I decided to create a repository svn and then a project folder within that.

mkdir /share/HDA_DATA/svn/projectA

and then

svnadmin create /share/HDA_DATA/svn/projectA

and edit the config files to password protect write

vi /share/HDA_DATA/svn/projectA/conf/svnserve.conf

[general]
### These options control access to the repository for unauthenticated
### and authenticated users.  Valid values are "write", "read",
### and "none".  The sample settings below are the defaults.
anon-access = read
auth-access = write
### The password-db option controls the location of the password
### database file.  Unless you specify a path starting with a /,
### the file's location is relative to the directory containing
### this configuration file.
### If SASL is enabled (see below), this file will NOT be used.
### Uncomment the line below to use the default password file.
password-db = passwd

and then edit the passwd file

[users]
username = password

and then start the SVN server with

svnserve -d --listen-port=3690


On Ubuntu I installed the following to enable command line and Nautilus / Gedit integration

sudo apt-get install rabbitvcs-nautilus rabbitvcs-gedit
sudo apt-get install subversion

To test the repository I used RabbitVCS SVN via Nautilus, Repository browser and then entered the url:

svn://ipaddress:3690/share/HDA_DATA/svn/projectA/

Monday, 23 December 2013

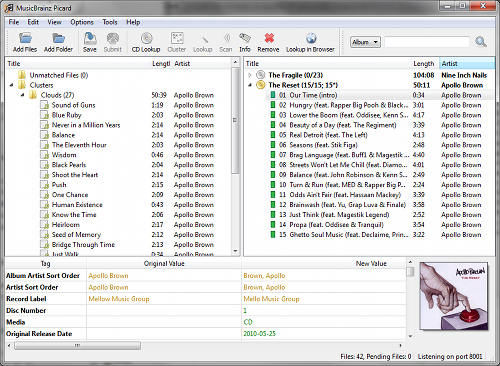
MusicBrainz Picard settings


MusicBrainz Picard


Options:

Cover Art


File naming


Move files to this directory when saving:
/home/user/Music

Move additional files selected with the following:

*.jpg *.png .*.mood

note the .*.mood as the .mood files are hidden files on a linux system and that was the only way I could figure out to identify them.

Name files like this:


$set(normalbumartist,$if($eq($lower($left(%albumartist%,4)),the ),$right(%albumartist%, $sub($len(%albumartist%),4))\, The,%albumartist%))
$if($eq(%albumartist%,Various Artists), $replace(VA/%album%-$left(%date%,4)$if(%discnumber%,-Disc %discnumber%,)/$num(%tracknumber%,2) - %artist% - %title%,:,), $firstalphachar($upper(%normalbumartist%))/%normalbumartist%/%album% - $left(%date%,4) - Disc %discnumber%/$num(%tracknumber%,2) - %normalbumartist% - %title%)


This is my custom script to enforce the correct rename of files.

And will create the following examples:

/home/user/Music/B/Beatles, The/Help! - 1965 - Disc 1/07 - Beatles, The - Ticket to Ride.mp3

And as per Metadata selection for "Various Artists" the following will be done for Various Artists,
/home/user/Music/VA/....

 Fingerprinting:


/chromaprint/fpcalc used.

I do find the following Plugins very handy:
Add Cluster As Release
Search Discogs for Release
Search with Google

To ensure proper mp3 tagging for iTunes I added the following to

Advanced/Scripting:
Tagger Script:
$if($and($eq(%compilation%,1),$ne(%albumartist%,Various Artists)),$set(compilation,0))


Saturday, 9 November 2013

Command line diff example

I had to compare some files for changes and used the diff command, thought I would add an example for reference.

File 1:

user@pc:~$ cat test1.txt
aa
aa
aa

File 2:
 user@pc:~$ cat test2.txt
aa
aa
bb
cc
dd
user@pc:~$

 Then the compare:

user@pc:~$ diff -rupN test1.txt test2.txt
--- test1.txt    2013-01-01 22:50:09.918800341 +0000
+++ test2.txt    2013-01-01 22:52:28.214796256 +0000
@@ -1,3 +1,5 @@
 aa
 aa
-aa
+bb
+cc
+dd
user@pc:~$
 Creating a patch file that will contain the difference:

user@pc:~$ diff -rupN test1.txt test2.txt > test3.diff
user@pc:~$ cat test3.diff
--- test1.txt    2013-01-01 22:50:09.918800341 +0000
+++ test2.txt    2013-01-01 22:52:28.214796256 +0000
@@ -1,3 +1,5 @@
 aa
 aa
-aa
+bb
+cc
+dd

Then to patch file 1:
user@pc:~$ patch test1.txt < test3.diff
patching file test1.txt

user@pc:~$ cat test1.txt
aa
aa
bb
cc
dd
user@pc:~$ 

 And if you need to reverse the patch:
user@pc:~$ patch -R test1.txt < test3.diff
patching file test1.txt

user@pc:~$ cat test1.txt
aa
aa
aa
user@pc:~$


Biltong Recipe


Ingredients:   

  • some vinegar
  • less than a table spoon of course salt (or Kosher salt)
  • 1/4 cup of brown sugar
  • 1/2 cup of coriander (whole)(get it at a bulk food store)
  • 1/2 teaspoon pepper (black pepper whole)


The steps for creating biltong:

  • wash the meat
  • cut the meat in strips
  • sprinkle the meat with vinegar
  • use the above biltong mix until the meat strips are well covered
  • place the meat in a tray over night in the fridge (dump any blood that has seeped out of the meat)
  • Hang the meat / biltong
  • Keep the biltong well ventilated and humidity controlled for about 4-7 days

Tuesday, 3 September 2013

OpenElec / XBMC - send a message to a client

With the Frodo release (12.2) of XBMC installed onto a Raspberry Pi via the OpenElec distribution I wanted a easy way to send messages to clients (therefore mitigating the need to shout upstairs )After some googling and trying different ways I found the following ways to display a notification on the client:
  1. Use the JSON-RPC API
  2. In System/Settings/Network/Services activate Allow control of XBMC via HTTP
    Then post something like the following into a browser:

    http://IP:PORT/jsonrpc?request={%22jsonrpc%22:%222.0%22,%22method%22:%22GUI.ShowNotification%22,%22params%22:{%22title%22:%22The%20Title%22,%22message%22:%22This%20is%20the%20message%20displayed%22},%22id%22:1} 


    It should ask for your username / password configured for the web service and afterwards display
    {"id":1,"jsonrpc":"2.0","result":"OK"}
  3. Use xbmc-send via ssh
    ssh into the Openelec client then use the following command
OpenELEC:~ # xbmc-send -a "Notification(Hey,Hey this is a message)"
  1. Use xbmc-send remotely
     Install xbmc eventclient (sudo apt-get install xbmc-eventclients-xbmc-send)then from the remote pc use the following command:
xbmc-send --host=IP_of_OpenElec -a "Notification(Title, the message to display,5000,/storage/.xbmc/addons/service.openelec.settings/resources/skins/Default/media/HomeIcon-Focus.png)"
5000 = the time to display the notification and ...//HomeIcon-Focus.png adds an icon to the notification. 

Friday, 23 August 2013

Installing Omnikey CardMan 3x21 in Ubuntu

The OmniKey uses the PCSC spesification, PC/SC (short for "Personal Computer/Smart Card") is a specification for smart-card integration into computer environments.

On Ubuntu Raring (13.04) this can be installed via:
sudo apt-get install pcscd 
sudo apt-get install pcsc-tools

Then download the latest firmware from the hidglobal website (search for the PC/SC CCID version) for x64 system it would be : "CardMan 3x21 PC/SC CCID for Linux X64"

Then unpack the file and run the installer:
cd /home/cccam/ifdokccid_lnx_x64-3.7.0/ 
chmod 755 install
sudo ./install

and lastly run the scanner to search for a card reader in a terminal window
cd 
pcsc_scan

if all go according to plan the following should see:
user@pc:~$ pcsc_scan 
PC/SC device scanner
V 1.4.21 (c) 2001-2011, Ludovic Rousseau <ludovic.rousseau@free.fr>
Compiled with PC/SC lite version: 1.8.6
Using reader plug'n play mechanism
Scanning present readers...
0: OMNIKEY AG CardMan 3021 00 00
Fri Aug 23 20:08:37 2013
Reader 0: OMNIKEY AG CardMan 3021 00 00
  Card state: Card removed, 

Watch SkyGo in Ubuntu

A great new project called pipelight launched that enable the playback of DRM enabled content via a browser plugin in native linux browsers like Firefox and Chrome.

https://launchpad.net/pipelight

I have tested it on Google Chrome 29 and with  a few changes as described as below I could playback SkyGo on my laptop.

The biggest challenge was the fact that SkyGo use the Silverlight 5 libraries and need to report a  "Windows User Agent e.g. Firefox 15 for Windows".

First step is to install pipelight
sudo apt-add-repository ppa:ehoover/compholio
sudo apt-add-repository ppa:mqchael/pipelight-daily
sudo apt-get update
sudo apt-get install pipelight

after that install SilverLight 5.0

sudo apt-get install wine-silverlight5.0-installer

Copy the default configuration file in your user directory:
cp /usr/share/pipelight/pipelight ~/.config/pipelight

and adjust the configuration ~/.config/pipelight such that it matches the specific Silverlight version:
dllPath = c:\Program Files\Silverlight\5.0.61118.0\
silverlightVersion = silverlight5.0

For SkyGo to work change the following as well
fakeVersion = 5.1.20513.0
overwriteArg = minRuntimeVersion=5.0.61118.0

For Chrome install User Agent Switcher  extension and select Windows Firefox 15 from the extension preferences to ensure it reports the correct user agent to Sky. Open the browser and select Firefox 15.
In order to force a reinstallation first close all your browsers and then delete the ~/.wine-pipelight directory.


It will then install the correct Silverlight and apply the "fake version"

Type chrome://plugins/ in the address bar to ensure the plugin loaded correctly.

my complete pipelight config file:

user@pc:~$ egrep -v "^$|^[[:space:]]*#" ~/.config/pipelight
winePath = /opt/wine-compholio/
winePrefix = $HOME/.wine-pipelight/
wineArch = win32
wineDLLOverrides = mscoree,mshtml=
pluginLoaderPath = /usr/share/pipelight/pluginloader.exe
gccRuntimeDlls = /usr/lib/gcc/i686-w64-mingw32/4.6/
dllPath = c:\Program Files\Silverlight\5.0.61118.0\
dllName = npctrl.dll
fakeVersion = 5.1.20513.0
overwriteArg = minRuntimeVersion=5.0.61118.0
overwriteArg = enableGPUAcceleration=false
windowlessMode = false
embed = true
dependencyInstaller = /usr/share/wine-browser-installer/install-dependency
silverlightVersion = silverlight5.0
operaDetection = true
len@madbuntu:~$ sudo apt-get install pipe
pipebench             pipemeter             pipenightdreams-data
pipelight             pipenightdreams       pipewalker
user@pc:~$

Tuesday, 20 August 2013

Duplicate MP's on Linux

DupeGuru Me

 
I know there are thousands of ways to sort out a mp3 collection, numerous bash scripts and mp3id readers and taggers however I never found a solution that work for me.

After some searching I found the following cross platform application called "dupeGuru me" by Hardcoded software, this is a great and simplistic tool and very good fuzzy search.

They have an PPA available at  https://launchpad.net/~hsoft/+archive/ppa

This can be added to your Ubuntu distribution via
sudo apt-add-repository ppa:hsoft/ppa

Raspberry Pi - Python


There are two ways to install the Python GPIO 

Method 1: Download and install / build it yourself:

The source can be found at:  https://pypi.python.org/pypi/RPi.GPIO
To copy it to your Raspberry Pi:
scp -rp RPi.GPIO-0.5.3a pi@[ip address of pi]:/home/pi/Documents/RPi.GPIO/
If you want to build your own version from this downloaded copy, make
sure that you have the Python development source installed first!
On Raspbian:
$ sudo apt-get install python-dev
$ sudo python setup.py install

Method 2: Raspbian repository

If you are using Raspbian, all you need to do to install the latest release is:
$ sudo apt-get update
$ sudo apt-get dist-upgrade
$ sudo apt-get install python-rpi.gpio python3-rpi.gpio

Wednesday, 10 July 2013

Java Decompiler

Had some class files that I needed to decompile and found JD-GUI to be a great program for this.
Only one snag, it requires 32bit gtk libraries.

How to install JD-GUI on Ubuntu 64-bit:

sudo apt-get install ia32-libs-gtk

after that just run the application jd-gui

and the source coe can e saved with "Save All Sources"


Wednesday, 19 June 2013

Oracle SQL Developer - SID

I had a scenario where they could not provide me with the SID for the connection.

If you have access to the Oracle database via a SQL interface (Like Oracle SQL developer or sqlplus) the below query can be used to determine the SID

select sys_context('userenv','db_name') from dual;
Or if you have access to the server terminal the below command can be used
lsnrctl status


Thursday, 7 February 2013

Converting multiple images into one PDF on Linux

The most simple way to do this is to use the command line
convert *.png result.pdf
This will create a single pdf and append all the png imges in the directory to the file.

Sunday, 3 February 2013

Add ‘Open in Terminal’ in Nautilus

This simple and brief tutorial is going to show you how to add “Open in Terminal” option on Ubuntu Nautilus’ context menu so that you can quickly open up a terminal window and automatically navigate to the selected directory.
Hit Ctrl+Alt+T to open up a terminal window, copy and paste this command and hit enter to install nautilus-open-terminal package:
sudo apt-get install nautilus-open-terminal
or click on this link


then restart or run this command
nautilus -q

Thursday, 31 January 2013

Using 635M Nvidia via Bumblebee on Ubuntu 12.10 64bit

After installing and re-installing the drivers multiple times the following order and packages worked for me. (Basically donig the same as most blogs advise but loaded the Nvidia current updates and configured Bumblebee to use it)

sudo apt-get install bumblebee bumblebee-nvidia linux-headers-generic

sudo apt-get install nvidia-current-updates

then edit /etc/bumblebee/bumblebee.conf

gedit /etc/bumblebee/bumblebee.conf
Driver=nvidia
KernelDriver=nvidia-current-updates
LibraryPath=/usr/lib/nvidia-current-updates:/usr/lib32/nvidia-current-updates
XorgModulePath=/usr/lib/nvidia-current-updates/xorg,/usr/lib/xorg/modules
reboot and test

user@machine:~$ glxspheres
Polygons in scene: 62464
Visual ID of window: 0xb5
Context is Direct
OpenGL Renderer: Mesa DRI Intel(R) Ivybridge Mobile
59.965973 frames/sec - 66.922026 Mpixels/sec
59.915626 frames/sec - 66.865838 Mpixels/sec
59.936809 frames/sec - 66.889479 Mpixels/sec
59.938094 frames/sec - 66.890913 Mpixels/sec
59.933819 frames/sec - 66.886142 Mpixels/sec
59.936031 frames/sec - 66.888611 Mpixels/sec
59.938894 frames/sec - 66.891805 Mpixels/sec
user@machine:~$ optirun glxspheres
Polygons in scene: 62464
Visual ID of window: 0x21
Context is Direct
OpenGL Renderer: GeForce GT 635M/PCIe/SSE2
132.639584 frames/sec - 148.025776 Mpixels/sec
144.849601 frames/sec - 161.652154 Mpixels/sec
143.661287 frames/sec - 160.325996 Mpixels/sec
143.061059 frames/sec - 159.656142 Mpixels/sec
142.425431 frames/sec - 158.946781 Mpixels/sec
152.831347 frames/sec - 170.559784 Mpixels/sec
user@machine:~$


Steam commands for different games:
Left 4 Dead 2 Beta - LD_PRELOAD=./left4dead2/bin/matchmaking.so vblank_mode=0 PRIMUS_SYNC=1 STEAM_RUNTIME=1 primusrun %command%
Dota 2 - optirun --bridge primus %command%
Counter Strike - vblank_mode=0 primusrun %command%

Friday, 18 January 2013

Ubuntu create launcher in unity

I wanted to create some custom launchers on Ubuntu in order to cleanup my desktop and add them to the Unity dash and found

Create-launcher a brilliant app in the Ubuntu Software Centre at https://apps.ubuntu.com/cat/applications/quantal/create-launcher/

To install it just click the below:

Get it from the Ubuntu Software Centre!