Thursday 7 January 2016

Apple OS X Manual Backup script with notifier


Recently I wanted to add some "user friendliness" to a backup script that do an FTP over TLS upload of multiple files and implemented the following:

  • a bash script that iterate through a directory (find) and upload (curl) and send a notification once completed.
  • used Automator to create an Application (that a user can run) - The application send a notification that execute when clicked
  • Created a "Login item" that execute the Automater application upon login and remind the user to perform backups (and the user can do so by clicking on the notification)

The bash script:

Loading ....

remember to make it executable : chmod u+x Backup_QB.sh
Some gotchas during the script troubleshooting:
  • If you have an @ (at sign) in the username or password replace (URL-encode) it with the HTML character code for it namely %40 e.g. username 'man@server' will be 'man%40server'
  • find command in the script needs to be completed with ' \;' remember the space.
Automator application:

For the Automator script to work correctly I had to install terminal-notifier from this Github
https://github.com/julienXX/terminal-notifier/releases
into the 'Applications' folder and point the script to the binary inside the app bundle for the application to work.
The command:

/Applications/terminal-notifier/terminal-notifier.app/Contents/MacOS/terminal-notifier -message "Time to run your backups" -title "Backup Script" -execute ~/Desktop/Backup_QB.sh

This was picked up during testing as the first run was from the terminal and 'sudo gem install terminal-notifier' and everything worked from the command line.


Terminal-notifier was used as the -execute function can be added that will execute a command if clicked.
save this as something.app in the 'Applications' folder.

At this point you have a fully working application that will create a notification and if the notification is clicked it will execute the backup script and send a second notification when completed.


and in the notification centre if configured.
When you click on the notification it will perform the backups as per the script and send the following notification upon completion:


Then finally to make sure a reminder is send to the user a login item is added to the profile to send this reminder whenever the user log in.

Open the Users & Groups pane of System Preferences and click the Login Items tab then add the 'Application' created in step 1.


Till a next time ....

Friday 1 January 2016

Mikrotik overlapping IP subnets on VPN link

As a common topic that needs to be resolved a lot of times I thought it would be good to do a basic write-up  of a basic double NAT configuration to resolve overlapping IP ranges over a link.

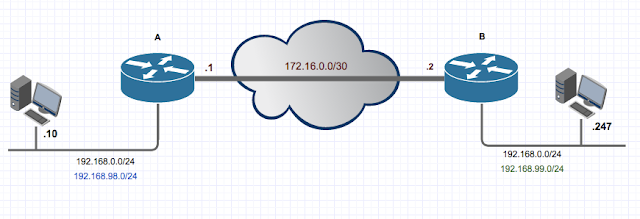
The sample scenario would be as depicted below:
Location A and B with duplicate IP ranges (192.168.0.0/24) on both sides and a VPN link between the two on network 172.16.0.0./30

For this example we would assume two random IP's that needs to be reached from either end, these will be 192.168.0.10 and 192.168.0.247


To make the mikrotik commands more descriptive all local networks (LAN A and LAN B) are connected to "ether2" interface and the link between the two routers to the "ether1" interfaces.

Router A:

/ip address
add address=192.168.0.1/24 interface=ether2
add address=172.16.0.1/30 interface=ether1


Router B:

/ip address
add address=192.168.0.1/24 interface=ether2
add address=172.16.0.2/30 interface=ether1


The next step would be to select two unused/free/unrouted IP ranges in the network that can be used at network A & B, for this example 192.168.98.0/24 and 192.168.99.0/24 were selected.

Install a route on router A to route all 192.168.99.0/24 traffic to the gateway address of router B (172.16.0.2)

Router A:

/ip route
add dst-address=192.168.99.0/24 gateway=172.16.0.2


Then install a source NAT rule that changes the source address of the packets from network A to 192.168.98.0/24. Packets will now have that changed source address and be forwarded to router B.

Router A:

/ip firewall nat 
add chain=srcnat src-address=192.168.0.2-192.168.0.254 dst-address=192.168.99.0/24 action=netmap to-addresses=192.168.98.2-192.168.98.254


Netmap is used to ensure there is a 1:1 mapping on the last octet; that way we will know what machine the traffic originated from.
On Router B a route needs to be installed to route the NATed traffic (.98.0/24) back to router A and destination NAT it to the real IP addresses in network B.

Router B:

/ip route
add dst-address=192.168.98.0/24 gateway=172.16.0.1


And the destination NAT rule to route the traffic to the 192.168.0.247 IP on network B (In this example one rule for each server you want to reach)

Router B:
/ip firewall nat
add chain=dstnat dst-address=192.168.99.247 action=dst-nat to-address=192.168.0.247

To reach 192.168.0.10 on router A do exactly the opposite, netmap the range to 192.168.99.x on router B and add a destination NAT on router A.


Router B:

/ip firewall nat 
add chain=srcnat src-address=192.168.0.2-192.168.0.254 dst-address=192.168.98.0/24 action=netmap to-addresses=192.168.99.2-192.168.99.254


Router A:
/ip firewall nat
add chain=dstnat dst-address=192.168.98.10 action=dst-nat to-address=192.168.0.10

This should complete the setup and you should be able to ping 192.168.99.247 from an IP on router A LAN subnet.

To further make things easier to use either DNS entries can be used or if the IP addresses you want to route to on the remote subnet are not used locally add them locally with a destination NAT so that you can use the real IP address locally to reach the remote server.

Sample:


Router A:
/ip firewall nat
add chain=dstnat in-interface=ether2 dst-address=192.168.0.247 action=dst-nat to-address=192.168.99.247