Saturday, 28 May 2016

Plex Media Server - Recently added stuck in front

So i had an issue where few movies were stuck in fromt of the recently added queue.

Tried removing and re-adding them to Plex with no luck.

As the metadata for all the items are stored in a sqlite3 database the following procedure were used to correct the instances.

Steps to follow:

  1. Find the item you want to edit
  2. Find the database to edit
  3. Exit Plex and update the database file.

Item you want to edit:

Select the movie or episode in question and select "..." >  "Info" or "Get Info" > "View XML" Bottom left of the window.
The property "ratingKey" is the id you need to update in the database.
Note: The date/time is stored in Unix Time in the XML output.

Database location:

On Windows install a SQLite editor e.g. SqliteBrowser
The database is located at


%LOCALAPPDATA%\Plex Media Server\Plug-in Support\Databases\com.plexapp.plugins.library.db


by default or can be found from the web interface: Settings > Server > General > "

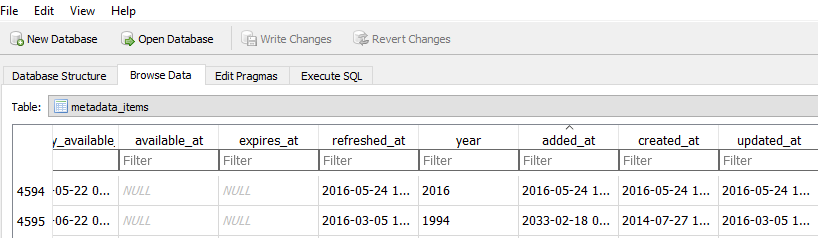
Open the database and select the "metadata_items" table.


Browse or search for the id with the value of ratingKey.
Update the time to the correct date/time, easiest would be to make the added_at value same as the created_at value.

Write/Save the changes back to the sqlite3 database and restart plex.


Command line:

This can be done from the command line as well with a command like:

UPDATE metadata_items SET added_at = created_at WHERE id=[value of ratingKey]


Wednesday, 25 May 2016

Splitting FLAC files based on CUE

image from https://en.wikipedia.org/wiki/FLAC
Install the following packages
  • cuetools
  • shntool
  • flac

sudo apt-get install cuetools shntool flac

Now the FLAC file can be split as follows:

cuebreakpoints inputfile.cue | shnsplit -o flac inputfile.flac

The result will be as follows: 
split-track01.flac
split-track02.flac
....


Wednesday, 4 May 2016

For when nohup is not available

So I recently had to execute a long running job on a bash shell,
however none of my usual tools like nohup, screen or tmux were available so below is the method I used to make sure I can start the job and disconnect the session.

  1. run the job in bash
  2. whilst running press ctrl-z (this will suspend the current foreground job (task)  )
  3. enter the job control command bg to add it as a background task
  4. then remove the job from the shell's job list disown -h 
  5. exit


Tuesday, 19 April 2016

A4988 Stepper Motor Driver


Helping out a friend with a new laser engraver led to me having to debug the circuit containing the A4988 Stepper motor driver.

Whilst doing that I used the following circuit and code on a Arduino UNO to test the various components.


The circuit use the following baseline from the Pololu website


Things to note:

It is important that VMOT be in the 8-35V range (I use 12V)

The Circuit used:


And the code:


Loading Gist: https://gist.github.com/madmouser1/dc271f3ed70175d9bd8c0b6b4edb50b7

Saturday, 2 April 2016

Ubuntu - merge Video files

The following applications can be used to concatenate video files.

Some ways to determine details of the media files :
ffprobe file.mp4
ffmpeg -i file.mp4

Extracting AC3 audio with FFMpeg

ffmpeg -i video.avi -acodec copy audio.ac3
or if there are multiple audio streams use the map to select the correct stream to extract

ffmpeg -i my_input_file.m4v -map 0:2 -c:a copy output_file.ac3 

MP4

sudo apt-get install gpac 
 MP4Box -add file1.mp4 -cat file2.mp4 NameofCombinedFile.mp4

Update:

And a way with ffmpeg (if all files are the same format):
ffmpeg -f concat -i <(for f in ./*.mp4; do echo "file '$PWD/$f'"; done) -c copy ../destination.mp4

Update2:

And to compress the mp4 afterwards for something like Youtube:
ffmpeg -i source.mp4 -codec:v libx264 -crf 21 -bf 2 -flags +cgop -pix_fmt yuv420p -codec:a aac -strict -2 -b:a 384k -r:a 48000 -movflags faststart target.mp4
Update 3: 

to add a audio channel to a video file:
MP4Box -new -add OriginalMovie.mp4 -add Track2.mp3#audio:delay=300 Output.mp4

MKV

sudo apt-get install mkvtoolnix

mkvmerge [global options] {-o out} [options1] {file1} [[options2] {file2}] [@optionsfile] 

AVI

sudo apt-get install transcode transcode-utils
avimerge -i part1.avi part2.avi -o joinedfile.avi


Wednesday, 30 March 2016

Plex - Amazon Kindle HDX


Recently the Kindle Fire HD stopped playing videos from plex, transcoding was active on the Plex server but still only sound played on the kindle.

After some research the following DLNA settings fixed the playback.

Select the Plex Server settings and "show advanced"
Select DLNA > DLNA client preferences:

Add the following:
IP=[IP of Kindle],DirectPlay=true,DirectStream=true,LocalResolution=1920x1080,RemoteResolution=1280x720,OnlineResolution=1280x720,LocalVideoQuality=74,RemoteVideoQuality=49,OnlineVideoQuality=49,SubtitleSize=100,AudioBoost=100,MusicBitrate=64

Sunday, 6 March 2016

Ubuntu - Node link to nodejs


If you use nodemon or another nodule that refer to node and not nodejs you can create a symbolic link:


sudo ln -s "$(which nodejs)" /usr/bin/node

Wednesday, 24 February 2016

showing progress whilst copying drive with dd


pv -tpreb /dev/sda | dd of=/dev/sdb bs=64M


The syntax is
 
pv filename
pv filename > /path/to/output
pv options filename | command1
pv options filename | command1 > output.file
pv filename | command1
command1 | pv | command2
pv -options input.file | command1 | pv -options > output.file

Thursday, 7 January 2016

Apple OS X Manual Backup script with notifier


Recently I wanted to add some "user friendliness" to a backup script that do an FTP over TLS upload of multiple files and implemented the following:

  • a bash script that iterate through a directory (find) and upload (curl) and send a notification once completed.
  • used Automator to create an Application (that a user can run) - The application send a notification that execute when clicked
  • Created a "Login item" that execute the Automater application upon login and remind the user to perform backups (and the user can do so by clicking on the notification)

The bash script:

Loading ....

remember to make it executable : chmod u+x Backup_QB.sh
Some gotchas during the script troubleshooting:
  • If you have an @ (at sign) in the username or password replace (URL-encode) it with the HTML character code for it namely %40 e.g. username 'man@server' will be 'man%40server'
  • find command in the script needs to be completed with ' \;' remember the space.
Automator application:

For the Automator script to work correctly I had to install terminal-notifier from this Github
https://github.com/julienXX/terminal-notifier/releases
into the 'Applications' folder and point the script to the binary inside the app bundle for the application to work.
The command:

/Applications/terminal-notifier/terminal-notifier.app/Contents/MacOS/terminal-notifier -message "Time to run your backups" -title "Backup Script" -execute ~/Desktop/Backup_QB.sh

This was picked up during testing as the first run was from the terminal and 'sudo gem install terminal-notifier' and everything worked from the command line.


Terminal-notifier was used as the -execute function can be added that will execute a command if clicked.
save this as something.app in the 'Applications' folder.

At this point you have a fully working application that will create a notification and if the notification is clicked it will execute the backup script and send a second notification when completed.


and in the notification centre if configured.
When you click on the notification it will perform the backups as per the script and send the following notification upon completion:


Then finally to make sure a reminder is send to the user a login item is added to the profile to send this reminder whenever the user log in.

Open the Users & Groups pane of System Preferences and click the Login Items tab then add the 'Application' created in step 1.


Till a next time ....

Friday, 1 January 2016

Mikrotik overlapping IP subnets on VPN link

As a common topic that needs to be resolved a lot of times I thought it would be good to do a basic write-up  of a basic double NAT configuration to resolve overlapping IP ranges over a link.

The sample scenario would be as depicted below:
Location A and B with duplicate IP ranges (192.168.0.0/24) on both sides and a VPN link between the two on network 172.16.0.0./30

For this example we would assume two random IP's that needs to be reached from either end, these will be 192.168.0.10 and 192.168.0.247


To make the mikrotik commands more descriptive all local networks (LAN A and LAN B) are connected to "ether2" interface and the link between the two routers to the "ether1" interfaces.

Router A:

/ip address
add address=192.168.0.1/24 interface=ether2
add address=172.16.0.1/30 interface=ether1


Router B:

/ip address
add address=192.168.0.1/24 interface=ether2
add address=172.16.0.2/30 interface=ether1


The next step would be to select two unused/free/unrouted IP ranges in the network that can be used at network A & B, for this example 192.168.98.0/24 and 192.168.99.0/24 were selected.

Install a route on router A to route all 192.168.99.0/24 traffic to the gateway address of router B (172.16.0.2)

Router A:

/ip route
add dst-address=192.168.99.0/24 gateway=172.16.0.2


Then install a source NAT rule that changes the source address of the packets from network A to 192.168.98.0/24. Packets will now have that changed source address and be forwarded to router B.

Router A:

/ip firewall nat 
add chain=srcnat src-address=192.168.0.2-192.168.0.254 dst-address=192.168.99.0/24 action=netmap to-addresses=192.168.98.2-192.168.98.254


Netmap is used to ensure there is a 1:1 mapping on the last octet; that way we will know what machine the traffic originated from.
On Router B a route needs to be installed to route the NATed traffic (.98.0/24) back to router A and destination NAT it to the real IP addresses in network B.

Router B:

/ip route
add dst-address=192.168.98.0/24 gateway=172.16.0.1


And the destination NAT rule to route the traffic to the 192.168.0.247 IP on network B (In this example one rule for each server you want to reach)

Router B:
/ip firewall nat
add chain=dstnat dst-address=192.168.99.247 action=dst-nat to-address=192.168.0.247

To reach 192.168.0.10 on router A do exactly the opposite, netmap the range to 192.168.99.x on router B and add a destination NAT on router A.


Router B:

/ip firewall nat 
add chain=srcnat src-address=192.168.0.2-192.168.0.254 dst-address=192.168.98.0/24 action=netmap to-addresses=192.168.99.2-192.168.99.254


Router A:
/ip firewall nat
add chain=dstnat dst-address=192.168.98.10 action=dst-nat to-address=192.168.0.10

This should complete the setup and you should be able to ping 192.168.99.247 from an IP on router A LAN subnet.

To further make things easier to use either DNS entries can be used or if the IP addresses you want to route to on the remote subnet are not used locally add them locally with a destination NAT so that you can use the real IP address locally to reach the remote server.

Sample:


Router A:
/ip firewall nat
add chain=dstnat in-interface=ether2 dst-address=192.168.0.247 action=dst-nat to-address=192.168.99.247